

Home>> News and Resources>>Settling Down in NZ>> Banking and IRD Set Up
![]()
How to Set up a Bank account and IRD
You need to sign up for a bank account and an Inland Revenue Dept (IRD) number in order to be paid wages. Both processes require in person verifications.
Before you can apply to get an IRD number, you’ll need to first get the bank account and a bank account statement showing a positive balance. And unfortunately, with few exceptions, banks no longer do both bank and IRD set ups so we’ve provided your with a links to find IRD verification centres.
There are a number of banks in NZ which offer similar rates and features. In selecting a bank, we suggest you choose based on what’s available closest to your location and, if you’re coming into a job in NZ, potentially one which your employer uses. You can discuss this with your Employer who may also be able to assist with setting up.
If you come to work in NZ through FRENZ, we work with you through the process; otherwise, you can use the following general guide for the set up.
![]()

Do initial Bank Set up Online to Save Time
- Most banks allow you to do an initial bank account set. Doing this will save you time in the branch but, to do this, you need a NZ mobile number. so we advise you to get a NZ mobile service as soon as you come into NZ. (SPARK is a brand which is available at Auckland International Airport in Arrivals)
- Once you get your mobile number, a bank account can be created. You’ll need to have your mobile handy because, when you complete the submission, the bank will immediately text you a bank verification. If you’re a FRENZ worker, we assist you with this.
- Once this is done, you’ll have to activate the account in the bank using the access number you’ve been provided.
![]()

Activate Your the Bank Account in a Branch
To activate your account, you’ll need to be identified and verified by the bank – in person.
- Most banks allow you to complete an online account application once you’re in the country and have the mobile number. By doing this step first, the bank can use the access number you’re provided via mobile to complete the rest of the application which saves a lot of your time in the branch.
- At the bank (and for IRD) you will need to provide a copy of your:
- Visa
- Original Passport
- Proof of NZ residence – Some banks allow hostel addresses to be used for this if you’re on a working holiday visa. Otherwise, migrant workers can use your Job Offer letter as long as it includes the resident location or use the tenancy agreement from within the Employment Agreement.
- Tax Identification Number (this is required for any and all countries in which you’ve previously had to pay taxes. If you haven’t had a TIN, you’ll have to note the reason why. Often this is because your ‘wages were below the tax threshold of the country’ )
- Some banks, except for Kiwibank, ask for overseas Utility Bills for the proof of address on an Overseas residence.
When choosing the type of account/s, we would suggest that you elect a savings and checking account, to which your wages will be paid and a banking card that also works as a credit card so that you can purchase groceries, etc online if you like.
![]()
Figure 1 This is an example of how a bank statement would look like with bank verification
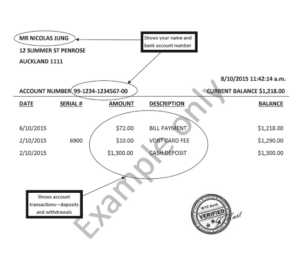
Make Sure You Get the Right Bank Account Proof for IRD
As part of the banking process, for IRD Verification purposes, you need to get a bank statement after opening the bank account which shows that you have a positive (greater than $0) balance in your account.
Usually, most banks know about IRD requirements and would guide you through what needs to be done but not always and you don’t want to get to IRD only to find out you need to go back to the bank because you don’t have adequate proof of bank account. Also, .
For this, you have to
- deposit some amount more than $10 in your newly activated bank account
- keep in mind that in NZ, facilities rarely use anything but EFTPOS (i.e, bank cards) or Credit Cards so you’re safer to carry little cash currency.
- withdraw an amount less than what you’ve deposited.
- If you use an ATM, some only allow $20 minimum withdrawals so we suggest deposit of at least $30
- Then you need to obtain a verified bank statement from the bank teller or the person setting up your account. Don’t leave without this!
![]()

Sign Up for your IRD Account
Once you have your bank account information, you’ll need to get in person verification for IRD.
With few exceptions, your bank will not provide this service to you so, you’ll have to find a NZ Post and AA Centre who will do this service. Also note that some AAs locations will allow a 48 hour ‘Urgent’ service for $10. We highly recommend you take advantage of this to avoid the usual 10 business days*.
You can use the locator below and call to confirm if the option is available: AA – https://locations.aa.co.nz/aa-centre
Generally, you don’t need/can’t make an appointment so we’d suggest you avoid going at lunchtime.
When you go, you’ll need to provide:
- Visa
- Original Passport – Ideally take a copy of the passport as well
- Proof of NZ residence – You can use your Employment Agreement with specific reference to the Tenancy Agreement page for proof of address.
- Tax Identification Number
- Completed IRD 742 – You can fill it here.
- Verified NZ Bank Statement which we’ve shown above
*No one but you are able to contact IRD for status or questions.
